Android testing with Espresso and Spoon
Published on
I’ve been spending some time recently setting up automated testing for our collection of Android apps and libraries at work. We have a mixture of unit tests, integration tests, and UI tests for most projects, and getting them all to run reliably and automatically has posed some interesting challenges.
Running tests on multiple devices using Spoon
Spoon is a tool developed by Square that handles distributing instrumentation tests to multiple connected devices, aggregating the results, and making reports.
As part of our continuous integration we build both application and test APKs, and these are pushed to the build server as build artefacts. A separate build job then pulls these artefacts down to a Mac Mini we have in the office, and executes Spoon with a few arguments:
java -jar spoon-runner.jar \
    --apk application.apk \
    --test-apk applicationTests.apk \
    --fail-on-failure \
    --fail-if-no-device-connected
Spoon finds all devices, deploys both APKs on them, and then begins the instrumentation tests. We use two physical devices and an emulator to cover the form factors and API versions that are important to us; if any test fails on any of those devices, Spoon will return an error code and the build will fail.
For library projects, you only have a single APK containing both the tests
and the library itself. The current version of Spoon requires both --apk and
--test-apk to be specified, so we simply pass in the same APK to both. It
looks like future versions of Spoon will be
more flexible in this regard.
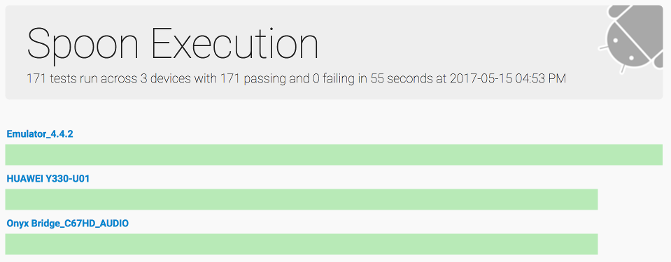
Spoon produces HTML reports, showing the status of each test run on each device. We have the report output folder collected as a build artefact, so the reports can be seen right from the build server:

Spoon output summary, showing results of 171 tests run on 3 devices
Flake-free UI testing with Espresso
Espresso is an Android library that provides an API for interacting with and making assertions about the UI of Android applications. Espresso has a very simple interface, and does lots of clever things under the hood to ensure that your tests only execute code when the UI is idle (and hence stable). You shouldn’t ever need to make your code sleep or wait.
In order for Espresso’s magic to work, it needs to know whenever some background
activity is going on that it needs to wait for. By default, it hooks in to
Android’s AsyncTask executor so it can wait for those to finish. In our apps,
there were a few cases where we used an explicit Thread to do some background
work, which caused tests to fail intermittently (depending on whether the thread
performed its UI update before or after Espresso executed the test code).
Rewriting these cases to use an AsyncTask enabled Espresso to figure out what
was happening and the tests started passing reliably.
Another, similar, problem occurred where we were using RxJava to load some data. There are two possible ways to deal with this… Espresso has a concept of an idling resource, which provides a way of telling Espresso when a resource is busy so it can belay interacting with or testing the UI until the resource is finished. In our case, the code in question was going to be rewritten soon, so we went for a quicker and dirtier option: force RxJava to use the same executor as AsyncTask.
To do this, we added a simple test utility class that registers an RxJavaPlugin
that overrides the Schedulers used by Rx:
/**
 * Hooks in to the RxJava plugins API to force Rx work to be scheduled on the
 * AsyncTask's thread pool executor. This is a quick and dirty hack to make
 * Espresso aware of when Rx is doing work (and wait for it).
 */
public final class RxSchedulerHook {

    private static final RxJavaSchedulersHook javaHook =
            new RxJavaTestSchedulerHook();

    private RxSchedulerHook() {
        // Should not be insantiated
    }

    public static void registerHooksForTesting() {
        if (RxJavaPlugins.getInstance().getSchedulersHook() != javaHook) {
            RxJavaPlugins.getInstance().reset();
            RxJavaPlugins.getInstance().registerSchedulersHook(javaHook);
        }
    }

    private static class RxJavaTestSchedulerHook extends RxJavaSchedulersHook {
        @Override
        public Scheduler getComputationScheduler() {
            return Schedulers.from(AsyncTask.THREAD_POOL_EXECUTOR);
        }

        @Override
        public Scheduler getIOScheduler() {
            return Schedulers.from(AsyncTask.THREAD_POOL_EXECUTOR);
        }

        @Override
        public Scheduler getNewThreadScheduler() {
            return Schedulers.from(AsyncTask.THREAD_POOL_EXECUTOR);
        }
    }
}
With the hook registered Rx does all of its work on the same thread pool as
AsyncTask, which Espresso already knows about. It’s not the best long-term
solution, but it means we don’t have to spend time integrating IdlingResource
for code that doesn’t have long to live. With the hook in place, the tests
that were flaking because of Rx started passing reliably as well.
Getting automatic screenshots of failures
Spoon provides a client library to, among other things, take a screenshot of the device. Espresso provides a hook that can be used to change how errors are handled. Putting the two together is very simple:
final FailureHandler defaultHandler =
        new DefaultFailureHandler(
                InstrumentationRegistry.getTargetContext());

Espresso.setFailureHandler(new FailureHandler() {
    @Override
    public void handle(Throwable throwable, Matcher<View> matcher) {
        try {
            Spoon.screenshot(
                    getActivity(),
                    "espresso-failure",
                    description.getClassName(),
                    description.getMethodName());
        } catch (Exception ex) {
            Log.e(TAG, "Error capturing screenshot", ex);
        }
        defaultHandler.handle(throwable, matcher);
    }
});
In our new error handler we simply ask Spoon to take a screenshot, then call Espresso’s original handler so that it can output its debugging information and fail the test. The Spoon runner automatically picks up the screenshot and adds it to the report:

Spoon output details, showing a screenshot captured of the failure
Having the screenshot, error message and logs all presented in a clean UI makes debugging failures much, much easier than searching through a huge build log to try and find the exception.
Filtering tests based on device capabilities
Some tests won’t work on every device you throw at them. We had two problems: some tests require a higher API version than some of our devices, and some of the UIs under test were designed to run only on certain resolutions.
The main cause for our dependence on newer API versions was the use of WireMock, a brilliant library for stubbing out web services. WireMock requires API 19, while our physical devices tend to run versions older than that. Stopping these tests running is simply a case of applying an annotation to the class:
@SdkSuppress(minSdkVersion=19)
Screen resolution is a bit more complicated. One of our apps is designed for a specific tablet device (and will never be used on anything else), and trying to render the UI on smaller screens results in items overlapping, important parts ending up below the fold, and other problems.
We’d still like all the other tests for that app to run on all of the devices,
though, so we can test them on a variety of API versions and in other
conditions. We just need to suppress the UI tests. To do this, we subclassed
the Android ActivityTestRule and overrode the apply method:
@Override
public Statement apply(Statement base, final Description description) {
    if (!canRunUiTests(InstrumentationRegistry.getContext())) {
        // If we can't run UI tests, then return a statement that does nothing
        // at all.  With normal JUnit tests we'd just throw an assumption
        // failure and the test would be ignored, but that makes the Android
        // runner angry.
        return new Statement() {
            @Override
            public void evaluate() throws Throwable {
                // Do nothing
            }
        };
    }

    return super.apply(base, description);
}

/**
 * Checks that the screen size is close enough to that of our tablet device.
 */
@TargetApi(Build.VERSION_CODES.HONEYCOMB_MR2)
private boolean canRunUiTests(Context context) {
    if (Build.VERSION.SDK_INT < Build.VERSION_CODES.HONEYCOMB_MR2) {
        return false;
    }
    int screenWidth = dpToPx(context,
            context.getResources().getConfiguration().screenWidthDp);
    return screenWidth >= 600;
}

private int dpToPx(Context context, int dp) {
    DisplayMetrics displayMetrics = context.getResources().getDisplayMetrics();
    return Math.round(dp * displayMetrics.density);
}
When the rule is run, we check if the screen width meets a minimum number of
pixels. If it doesn’t, an empty Statement is returned that turns the test
into a no-op. These show up as passed rather than skipped in the output, but
there doesn’t seem to be a nice way to signal to the Android JUnit runner that
the test is being ignored programatically.
Have thoughts that transcend nodding? Send me a message!
Related posts

How to break everything by fuzz testing
Fuzz testing, if you’re not aware, is a form of testing that uses procedurally generated random inputs to see how a program behaves. For instance, if you were fuzz testing a web page renderer you might generate a bunch of HTML - some valid, and some not - and make sure the rendering process didn’t unexpectedly crash. Fuzz testing doesn’t readily lend itself to all types of software, but it p...

Reverse engineering the Sense API
Sense is a little device that sits by your bedside and, in conjunction with a little ‘pill’ attached to your pillow, monitors your sleeping patterns and any environmental conditions that might hamper them. Android and iOS apps show you your sleep history, and offer suggestions for improvements. Sense was Kickstarted in August 2014, raising over 2.4 million US dollars, and shipped to ba...

Further Adventures in Music Organisation
I wrote before about how I’d dropped Spotify in favour of locally stored music, but things have advanced a bit since. I had a few issues: Tauon would occasionally manage to lose its database and along with it all my carefully constructed playlists and song ratings, and the experience on my phone was not very fun. I had to manually sync the music by plugging my phone in to the computer, and s...
I've been spending some time recently setting up automated testing for our collection of Android apps and libraries at work. We have a mixture of unit tests, integration tests, and UI tests for most...