Home Automation Without the Megacorps
Published on
I first experimented with home automation in 2016, by picking up a Samsung “SmartThings” hub. It was terrible. The UI to configure things was slow and clunky, firmware updates were applied whether you wanted them or not, and everything stopped working if their cloud services stopped. You were also locked into whatever integrations they deigned to support, of course. After that broke for the umpteenth time I scaled back and for years the closest I got to home automation was a couple of Hue bulbs.
Recently I’ve been building it out again, though. This time using off-the-shelf components that interop using Zigbee, open-source software, and some code I wrote myself. It’s great; it runs entirely locally and has had basically zero downtime. The Zigbee ecosystem lets me integrate all sorts of things without having to spend lots of money on “smart” alternatives. I think I’ve spent less on this incarnation than I did on the original SmartThings hub all those years ago (even without adjusting for inflation!).
My current setup
I run everything on a Raspberry Pi 4, with a Sonoff USB Zigbee adapter based on the CC2652P chipset1. Interfacing with the Zigbee stack is handled by zigbee2mqtt (z2m for short), an open-source project that basically bridges your devices to an MQTT broker2. When a device reports some data, it will send a new message over MQTT; when you want to make a device do something you just post a message back. It’s incredibly lightweight, but supports a huge array of devices out of the box. And as it’s just using MQTT, it’s trivial to integrate with other software or build on top of.
I know a lot of people building out this kind of home automation use Home Assistant, but I don’t get on with it terribly well. It felt incredibly sluggish, and the entire project is just a bit… much. I want a binary or package or docker image I can just run, not an entire operating system. That’s not how computers are meant to work! In contrast, z2m is simple to set up, super light weight and responsive.
Anyway. z2m exposes Zigbee devices over MQTT, so I wrote some code in Go to connect to the MQTT broker, and listen to the messages. It’s grown a bit beyond this now, and I’m skipping some boring bits like error handling and JSON parsing, but at first I had something like:
for {
    message, topic, err := c.ReadSlices()

    if string(topic) == "zigbee2mqtt/desk-button" {
        if strings.Contains(message, "single") {
            c.Publish(nil, []byte("{\"state\": \"TOGGLE\"}"), "zigbee2mqtt/room-lights/set")
        }
    }
}
I think I actually made this harder to read by trying to simplify it here, but hopefully you can follow that it was relatively straight forward to listen for a particular action to happen (in this case me “single”-pressing on the device called “desk-button”) and then make another device do something in response (toggling the state of the “room-lights” device).
So what actually are these devices? At present in z2m I have the following:
- Some generic buttons
- An air quality sensor (USB powered), and a separate temperature sensor (battery powered)
- A light switch
- Some 240V relay modules, that I use to turn non-smart devices on and off
- Some USB relay modules, for the same purpose
- Some “smart” plugs that I mostly use to monitor power usage
- A motorised blind roller
I think all of these are either Tuya or Moes branded, and were all sourced from AliExpress. You can get the same things from Amazon or elsewhere, but they tend to be 3-4x more expensive for the same product.
One of the cool things about Zigbee devices is that the powered ones work together to create a mesh network, so you don’t have to worry about network repeaters or signal strength like you do with Wi-Fi networks. z2m even makes a map showing the connections:

The network map produced by z2m. You can see how all the powered devices form a mesh that the lower power ones can connect to.
Some interesting automations
A Zigbee relay spliced into the power cable for the fan
So what do I actually do with all of this? Some of it is just what I’ll call “laziness automation”: I want to be able to turn on the lights without getting up and walking to the light switch. So there’s a Zigbee button on my desk that does it. Then there are some less manual automations: my blinds are automatically closed at sunset3, for example. It feels a bit trivial, but it’s surprisingly nice just not to have to think about that at all.
Another nice quality of life automation is the light I have above my monitor. It’s USB powered, and I now have it going through a Zigbee USB relay that lets it be toggled on and off. Then I have a small agent running on my desktop that turns the light on when the computer is unlocked, and off when it locks or shuts down. I keep meaning to make a “film mode” that detects when I’m watching a film, and turning all the lights and blinds down, but I haven’t got around to it yet.
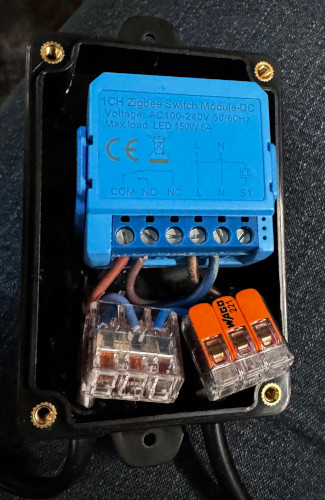
The most complex automation is probably for a window fan. It’s not smart in any way, so I cut the power cable and inserted a Zigbee relay. The whole thing is housed in a little project box to keep it secure. The relay basically acts as a switch: the live wire leading to the fan runs to the “normally open”4 contact, while the upstream power goes to “common”. When the relay is told to turn the fan on, the two get connected and the fan gets power. Oh, it’s also not actually a window fan, but I designed and 3D printed some adapters so that it sits right in the window.
So now we have a window fan that can be turned off and on automatically. But I don’t want to have to press a button to do that. I’m lazy, remember? Instead, I made it so that the Go code constantly monitors the temperature reported by the air quality sensor, and queries the free OpenWeatherMap API to get the rough temperature outside. It can then turn the fan on if the room is too hot, and outside is cool enough to make a difference (there’s no point in blowing hotter air in!).
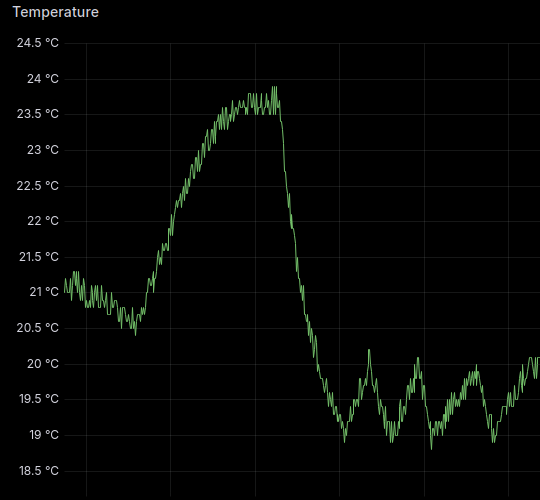
A graph of room temperature, showing the effect of the fan being turned on and off
I don’t want it to do that all the time though. The room doesn’t need to be cooled if I’m not around. There are various Zigbee presence sensors you can get, but the cheaper ones seem to be of dubious quality. Instead, I wrote some code to guess whether I’m present. It uses the state of the monitor light as a proxy for “is the computer in use”, and then makes some guesses based on the last time the computer was used and the current time (if I turn the computer off at midnight it probably means I’m going to sleep; if I turn it off at 2pm it probably means I’m going out somewhere).
You can see in the graph that the fan has a decent impact on temperature. I coded it to cool the room to 19 degrees, but then not turn on again until it was above 20. This prevents it flip-flopping on and off constantly. You can clearly see the pattern in the graph, as it actively cools and then slowly the room warms back up. This arrangement is much better than being woken up at 5am because it’s painfully cold. Trust me.
Bonuses: metrics and 3D printer
One of the things my custom Go code does is collate all the various stats reported by the Zigbee devices, and inserts them into a VictoriaMetrics database. I originally hosted this on the Pi itself, and it performed fine, but I’ve since moved it onto a server so that I can use it for some other things as well.
I set up Grafana to point to VM, and can create dashboards showing power usage, what devices are turned on when, and a bunch of environmental conditions. This also makes it easy to spot how good the data coming from the devices are. For example, the air quality sensor reports a figure for the amount of Carbon Dioxide in the air, as well as the amount of Volatile Organic Compounds (VOCs). The graphs are basically identical, but on a different scale. It turns out this particular device has no actual way of detecting CO₂, so it just “calculates” it from the VOCs figure. Useful to know if you want to actually use that data.
Recently I came across a go library for interacting with Bambu Lab printers, so I’ve also hooked that into my automation. It exports metrics about the printer, so I now have a way of seeing what’s going on when I’m not physically present5. I even added a HTTP endpoint (exposed over Tailscale) that shows pictures from the built-in camera.
On the automation front, I’ve made it automatically turn off the printer’s light when it finishes a print, and also added push notifications via PushOver whenever the state changes. No longer will I be sat in another room blissfully unaware it ran out of filament seconds after I walked out the door!
Was it worth it?
These days you could probably just buy some kind of ‘smart home’ hub that works well enough, and do most of what I’ve done with a lot less effort and no coding. I’m still of the opinion that for something so essentially local, it should itself be managed entirely locally. I don’t trust companies like Google or Amazon not to kill their products, or change or remove an API I rely on.
Obviously the “Not Invented Here” approach of coding everything yourself doesn’t suit everyone, but as someone who enjoys coding and enjoys having things work just so it works very well for me.
-
It turns out the chipset is important. I initially used a similar Sonoff dongle that used a CC2531 chipset, and its performance wasn’t great. It often failed to pair with new devices, and dropped links to existing ones. The zigbee2mqtt docs do explicitly advise against the CC2531 chips for that reason. At the time they recommended CC2652Ps, so that’s what I went with. If you’re starting new I’d go with whatever their latest recommendation was. ↩︎
-
MQTT is basically a network protocol for publishing and subscribing to arbitrary messages. A broker is the thing that sits in the middle and routes the messages. I use Mosquitto but any will do. ↩︎
-
They originally also re-opened at sunrise but that was a terrible mistake. Who knew the sun rose so early?! ↩︎
-
“open” meaning “there’s a gap so it doesn’t work” not “open for business”. This confusion in terminology also extends to drawbridges. ↩︎
-
I use the printer in LAN mode, which means there’s no way to monitor it from a phone, even if you’re connected to the same network still. ↩︎
Related posts
Monitoring power draw with WeMo Insight Switches
I recently picked up a couple of Belkin’s WeMo Insight Switches to monitor power usage for my PC and networking equipment. WeMo is Belkin’s home automation brand, and the switches allow you to toggle power on and off with an app, and monitor power usage. The WeMo Android app is pretty dismal. It’s slow, doesn’t look great, and crashed about a dozen times during the setup pr...
Further adventures in 3D printing
Not quite a year ago, I bought a Sovol SV06 3D printer and wrote about my initial experiences. At the end I joked:
Project log: Filament weight display
One problem I have when 3D printing is that it’s hard to gauge whether there’s enough filament left on a roll to complete a print. Sometimes it’s obvious when the print is small or the roll is full, but often it’s not. If I’m unsure about it, I end up obsessing over the printer instead of just leaving it to do its thing. The typical approach to this problem is to use ...
I first experimented with home automation in 2016, by picking up a Samsung "SmartThings" hub. It was terrible. The UI to configure things was slow and clunky, firmware updates were applied whether y...