How I use Tailscale
Published on
The Tailscale logo
I’ve been using Tailscale for around four years to connect my disparate devices, servers and apps together. I wanted to talk a bit about how I use it, some cool features you might not know about, and some stumbling blocks I encountered.
I’m not sure Tailscale needs an introduction for the likely audience of this blog, but I’ll give one anyway. Tailscale is basically a WireGuard1 orchestration service, with lots of nice features sprinkled on top. It’s a subscription product, but it has an insanely generous free tier that covers basically anything you’d ever want to do as an individual. They also open source all their client software, and there’s a third party control server implementation called Headscale if you want to avoid the hosted system entirely.
Basic connectivity
At its core, Tailscale lets you easily connect from one device to another, even if they’re not directly exposed to the Internet. You install the Tailscale client wherever you like (on your phone, computer, servers, Raspberry Pi, etc), authenticate the machine with the control server, and it can then talk to all the other machines on the tailnet using their private Tailscale IP addresses.
That isn’t anything revolutionary: it’s the basic premise behind VPNs. But Tailscale makes it so easy. You don’t have to bother with any networking configuration. You don’t have to distribute keys. You just install the client2, and login.
For example, my home automation service runs on a Raspberry Pi that sits behind two different routers. I installed Tailscale on it3, logged in, and immediately I could SSH into it from my computer or my phone even when they’re on different networks.
Speaking of SSH, Tailscale has special support for it whereby it handles any incoming connection to port 22 from the Tailscale network, and deals with authentication itself. No public keys or passwords: if you’re logged into Tailscale you can be logged into the machine. This is particularly handy when you SSH from a phone, as proper credential management is a bit of a nightmare there.
Exposing entire machines is just the start, though. If you run multiple services on the machine you need to remember which port they’re all on. Yuck. Instead, you can expose individual services as their own node on a tailnet. There are lots of options for doing so: there’s an official Docker image, a Go library, and many third-party tools (such as my own Centauri and tsp).
Not just a VPN
Exposing individual services wouldn’t be much use if you still had to remember
their IP addresses. For a long time I manually added DNS entries for Tailscale
nodes, allowing me to connect to http://grafana/ instead of
http://100.73.190.100. Recently I switched to Tailscale’s MagicDNS,
though, which takes care of that for you. Every machine on the tailnet gets
an automatic DNS entry based on its name.
I initially shied off of this because it changes the DNS resolver on every machine it’s installed on, and it all seemed a bit too “magic” for me4. I got fed up with manually adding DNS entries though, so I spent a bit of time learning about it and got over my knee-jerk “what on earth is going on?!” reaction. The DNS controls also let you force a specific upstream DNS server. I use NextDNS everywhere, so having Tailscale automatically configure this for me on all my devices was a bonus5.
As well as the short names, you can resolve nodes on the tailnet using a
slightly longer form: machine.your-tailnet.ts.net. The “your-tailnet” bit
is randomly generated, and you can reroll it in the control panel to find a fun
one. But why waste time say lot word, when few word do trick? Because Tailscale
can make these addresses globally routable, and issue TLS certs for them too.
Say you’re developing something on your local machine, and want to get feedback from someone. You can use Tailscale’s “funnel” feature to expose it publicly:
tailscale funnel 127.0.0.1:8080
With no other options, this will expose the service over HTTPS on port 443.
You can then invite people to visit https://machine.your-tailnet.ts.net and
they’ll connect through to port 8080 on your machine. They don’t even need
Tailscale installed. I don’t use this terribly often, but it’s a great
quality-of-life improvement on the occasions I do want to share something.
Tailscale also has a “serve” command, which does much the same but only
exposes it over your tailnet. This is how you’d use the Tailscale Docker image
to expose a normal service onto your tailnet, but it’s also useful for similar
development scenarios. Occasionally I’ll want to test something on my phone,
and rather than make sure it’s connected to the right Wi-Fi network, recompiling
the app to not bind to localhost, figuring out my machine’s IP, and so on, and
so forth, I just run tailscale serve and access it over Tailscale.
Authentication, two ways
One of my minor frustrations with Tailscale was how cumbersome the authentication process was. I logged in using GitHub, and every time I tried to login to Tailscale, I had to bounce through the GitHub OAuth flow and then select which organisation I wanted to use. Even if I was logged in to GitHub, it still shows the permission page every time. It’s not a dealbreaker, but it’s definitely not smooth. This is what it looks like:
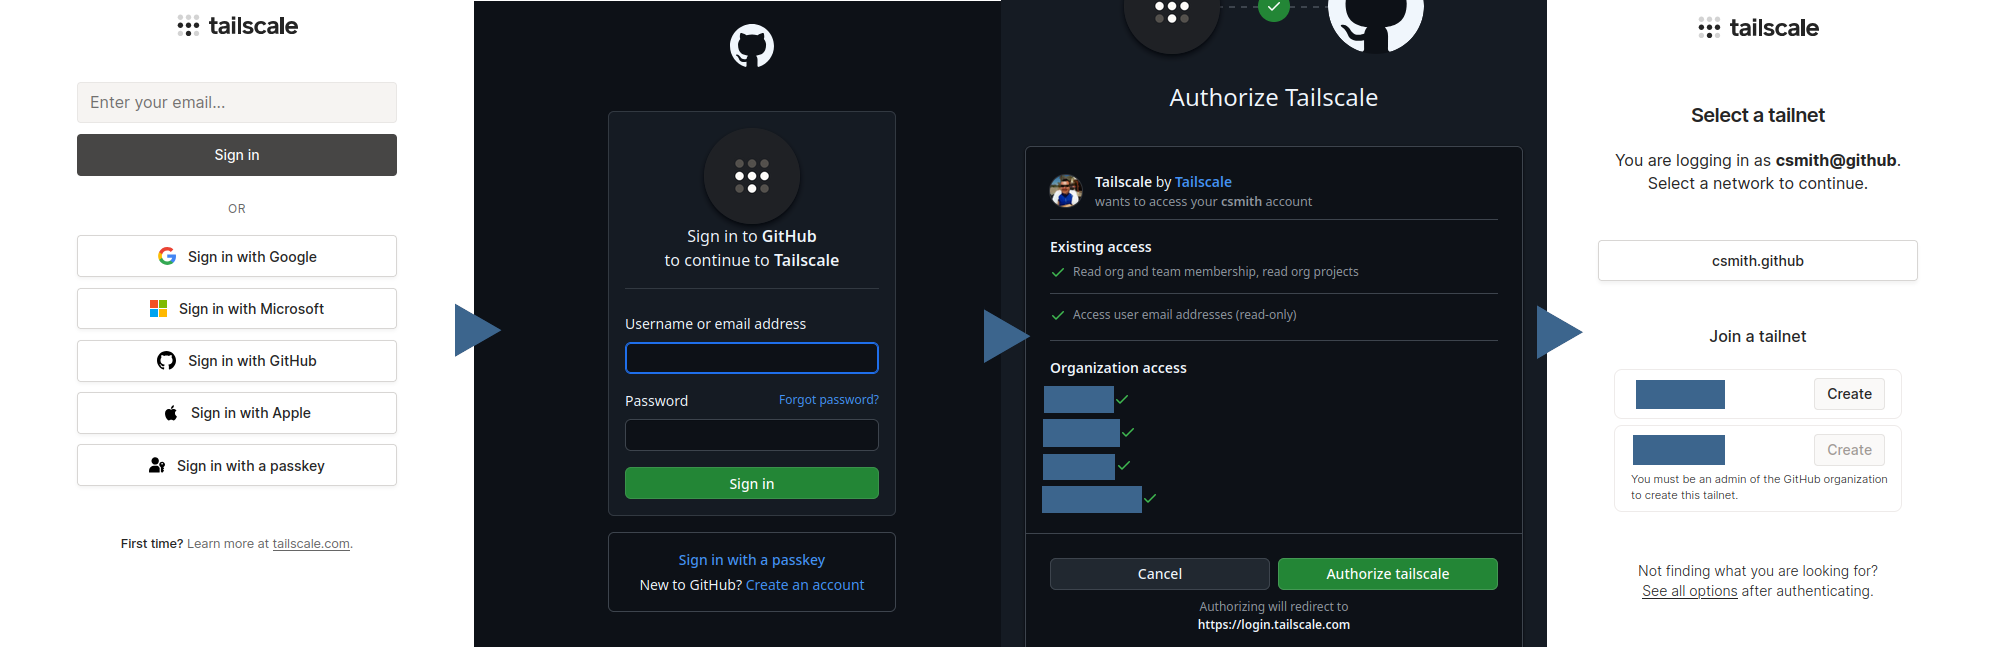
Logging in to Tailscale with a GitHub account
Tailscale have since added the ability to sign in with a custom OIDC provider, so I set up a KeyCloak instance, and my login flow now looks like this:
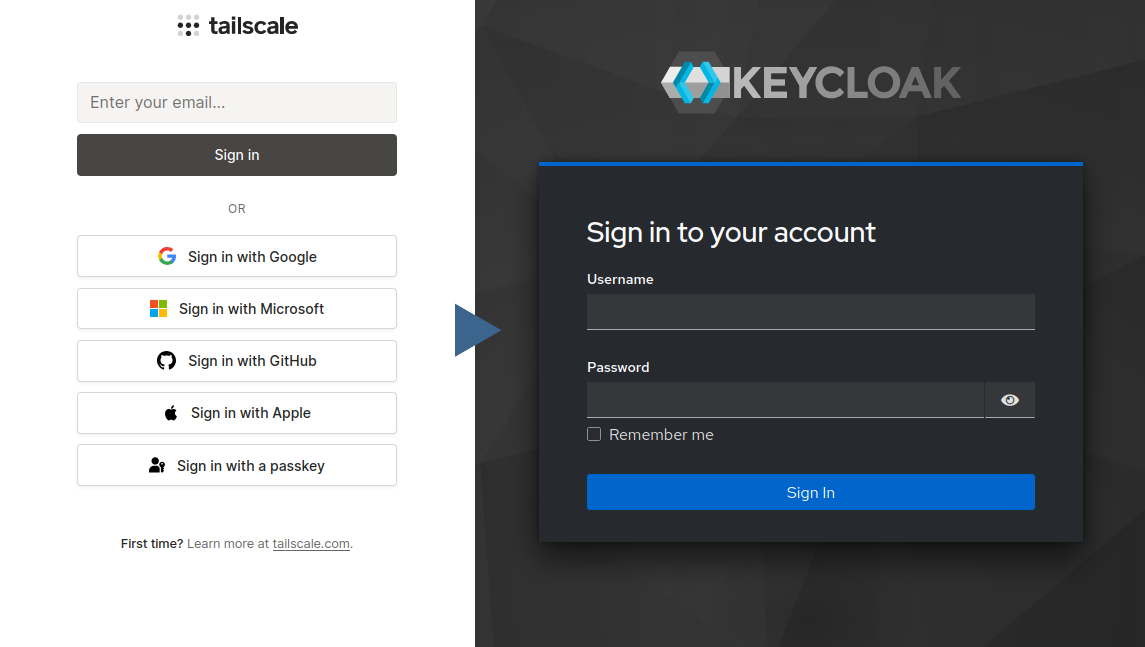
Logging in to Tailscale with KeyCloak as an OIDC provider
It’s a significantly shorter flow, and because KeyCloak is entirely under my control I can configure how long I stay logged in for. It also reduces my reliance on third parties: if GitHub goes down, or decides to ban my account6 or something, I can still access Tailscale.
That’s how you log in to Tailscale, but Tailscale can also assist with logging in to other services. If you connect to a HTTP service over Tailscale, it will add in the following headers:
Tailscale-User-Login: alice@example.com
Tailscale-User-Name: Alice Smith
Tailscale-User-Profile-Pic: https://example.com/photo.jpg
A lot of software has support for accepting login credentials provided by a reverse proxy, which is basically what’s happening here. For example, I run a Grafana instance that’s only exposed over Tailscale. Its config (set in environment variables) is:
GF_USERS_AUTO_ASSIGN_ORG: "true"
GF_USERS_AUTO_ASSIGN_ORG_ROLE: "Admin"
GF_AUTH_PROXY_ENABLED: "true"
GF_AUTH_PROXY_HEADER_NAME: "Tailscale-User-Login"
GF_AUTH_PROXY_HEADER_PROPERTY: "email"
GF_AUTH_PROXY_AUTO_SIGN_UP: "true"
So anyone who presents a Tailscale-User-Login header gets an admin account
created with that as their e-mail address. It’s super convenient, but obviously
make sure it’s only exposed via Tailscale if you do that!
Other services I run that support this include Miniflux (an RSS reader), Jelu (a book tracker), Linkding (a bookmark manager), and Seafile (a file storage system). If you’re hosting something yourself, look out for “proxy auth” or “remote users” in the documentation or configuration. It’s amazingly convenient to be able to access things without entering credentials.
ACLs, tags and mistakes
For a long time I didn’t bother with any kind of ACLs within my Tailscale network. Every machine could access every other machine. Then one day a thought hit me. The default Tailscale SSH config re-prompts you for user authentication, but I’d disabled that by tweaking the config… That means anyone with access to any of my machines (or who managed to get Tailscale credentials out of one of my apps) would be able to SSH into anywhere else on my network. Even as root! Compromising a small bit of my network would immediately lead to a complete take-over. What’s the point in defence-in-depth if you roll out a red carpet over the drawbridge for any attackers?
The first and most obvious fix for this was to restrict root access over SSH. I changed my Tailscale ACL to prompt for reauthentication for root access, but still allow regular SSH unprompted:
{
  "ssh": [
    {
      "action": "accept",
      "src":    ["autogroup:member"],
      "dst":    ["autogroup:self"],
      "users":  ["autogroup:nonroot"],
    },
    {
      "action": "check",
      "src":    ["autogroup:member"],
      "dst":    ["autogroup:self"],
      "users":  ["root"],
    },
  ],
}
This still didn’t sit right with me, though. Why should a random webserver be
able to (theoretically) SSH into my desktop computer unchallenged? Tailscale
allows you to do more advanced ACLs by applying tags to devices. I dutifully
created a bunch of tags, and went through and tagged every device: user, server,
app, container, and so on. This, it turns out, was a mistake. I could no
longer SSH to anywhere. If I’d read
the docs properly, I might have noticed
how they describe tags:
Tailscale tags are how you authenticate and identify non-user devices, such as servers and ephemeral nodes. They serve two primary purposes: to provide an identity to non-user devices and to let you manage access control policies based on purpose.
By applying a nice user tag to all of my devices (computer, phone, tablet and
so on), I’d effectively removed my own identity from them. They no longer
counted for the autogroup:member source in the SSH config. Whoops. And it’s
not easy to fix either:
You cannot remove all tags from a device. A device with a tag-based identity must have at least one tag.
So I’d have to remove all the affected devices, then re-add them. At the time I wanted to roll back all the tags, which would mean reconnecting dozens of nodes to the Tailnet. I did end up doing that, but I also took it as an opportunity to switch to KeyCloak as I mentioned earlier. Setting everything up again was a bit less painful when it wasn’t just correcting a dumb mistake.
I now have a much more sensible tag setup: servers are tagged server,
apps are tagged app, and a few special apps are tagged integration. I then
use Tailscale’s grants to limit access within the tailnet:
{
  "grants": [
    {
      // Users can access everything
      "src": ["autogroup:member"],
      "dst": ["*"],
      "ip":  ["*"],
    },
    {
      // Servers and integrations can access integrations and apps
      "src": ["tag:server", "tag:integration"],
      "dst": ["tag:integration", "tag:app"],
      "ip":  ["*"],
    },
  ],
}
This stops anyone but a user device from accessing servers, and stops plain
apps from accessing anything at all. So for example my Grafana instance is
tagged as an app; it doesn’t connect out over Tailscale for anything, it only
exposes its interface over Tailscale. My home automation software is tagged as
an integration, as it reaches out to other services over Tailscale (e.g., to
push metrics it receives from devices).
You could go even further and limit which specific machines talk to which others, but I think this tier system sets reasonable boundaries for my use without getting too much in the way.
Even more
There are lots of other cool features offered by Tailscale that I’ve not covered: exit nodes (allowing you to route normal Internet traffic over Tailscale; very handy when you’re behind a router you don’t trust, or if you want to appear as being in another country for totally legitimate reasons); Tailscale lock (a system where existing nodes have to verify any new ones, guarding against both unauthorised access and Tailscale themselves inserting nodes into your network); file sharing, and more I’ve probably forgotten.
As I mentioned before, an awful lot is available on the free personal plan. It’s definitely worth checking out if you manage servers, or self-host anything. I can’t imagine going back to managing servers and private apps without Tailscale, and I’m excited to see what else they do going forward.
-
If you’re not familiar with it, WireGuard is a modern VPN included in the Linux kernel. It’s basically the only VPN that isn’t terrible. ↩︎
-
They have installation instructions and packaged versions of the client for just about every device you can imagine: Windows, Mac, every major Linux distribution, iOS, Android, etc, etc ↩︎
-
They even have an apt repository specifically for raspbian builds, so it’s super easy. ↩︎
-
Lots of people seem to treat “magic” as a good thing in software. I think it’s the absolutely opposite. I want to know how something works, not for it to be inscrutable! ↩︎
-
This is entirely optional, of course, you can just let each device do their own thing as well. ↩︎
-
I don’t think this is likely, but it’s one of my biggest concerns about using “social” logins. More-or-less all of these services can arbitrarily ban you with no recourse; why would you trust them as keyholders to other things? ↩︎
Related posts
An interesting Tailscale + Docker gotcha
As I’ve written about before, I use Tailscale for a lot of things. I thought I had it set up in a reasonably secure manner, but I recently noticed a problem. I use Tailscale’s ACLs to limit what each node can access, based on the tags I apply to it. So an app node can’t access anything via Tailscale, while an integration or server node can access things tagged with either app or ...

Exposing game servers over Tailscale
I’ve recently been playing a lot of Factorio with a friend. I’ve been hosting, but my desktop computer is behind far too many layers of NAT, and I can’t be bothered dealing with setting up port forwards. Up until today we made do with Steam’s networking support, which in our case ended up relaying the connection via one of their servers. This is amazing as a free, no-hassle...

Avoiding the Consequences of Dumb Laws with Tailscale
More and more sites are implementing privacy-invading age checks or just completely blocking the UK thanks to the Online Safety Act. Protecting kids from some content online is certainly a noble goal, but the asinine guidance from Ofcom, threats of absolutely disproportionate fines, and the stupidly broad categories of content have resulted in companies just giving up or going through a tick-box e...
{% figure "right" "The Tailscale logo: a 3x3 grid of dots, with the middle row and bottom middle dot in white, forming a T shape" %} I've been using [Tailscale](https://tailscale.com/) for around f...